How to Remember Slide Positions Easily on Trombone
“How to remember slide positions easily” is one of the first goals every trombone student faces. Unlike valves on a trumpet, the trombone depends on your ear, muscle memory, and visual cues to land notes in the right place. This can feel tricky at first because you’re moving the slide without fixed “buttons” to guide you.
You might already know the basics: seven main positions on the slide, each producing different notes depending on whether you’re playing in first, second, or higher partials. The real challenge is locking these into your memory so you can play smoothly without guessing.
In this article, you’ll learn not only the seven trombone slide positions and the theory behind them but also memory tips, effective exercises, and how pro players fix slide-slips.
You will discover how to combine visual cues, ear training, and muscle memory to solidify your recall.
By the end, you’ll feel more secure in live playing, rehearsals, and solos because you’ll know how to remember slide positions easily without overthinking or hesitation.
What exactly are the 7 trombone slide positions?
People often ask, What are the slide positions on a trombone? and What notes correspond to sliding positions? Knowing this is essential to learning how to remember slide positions easily.
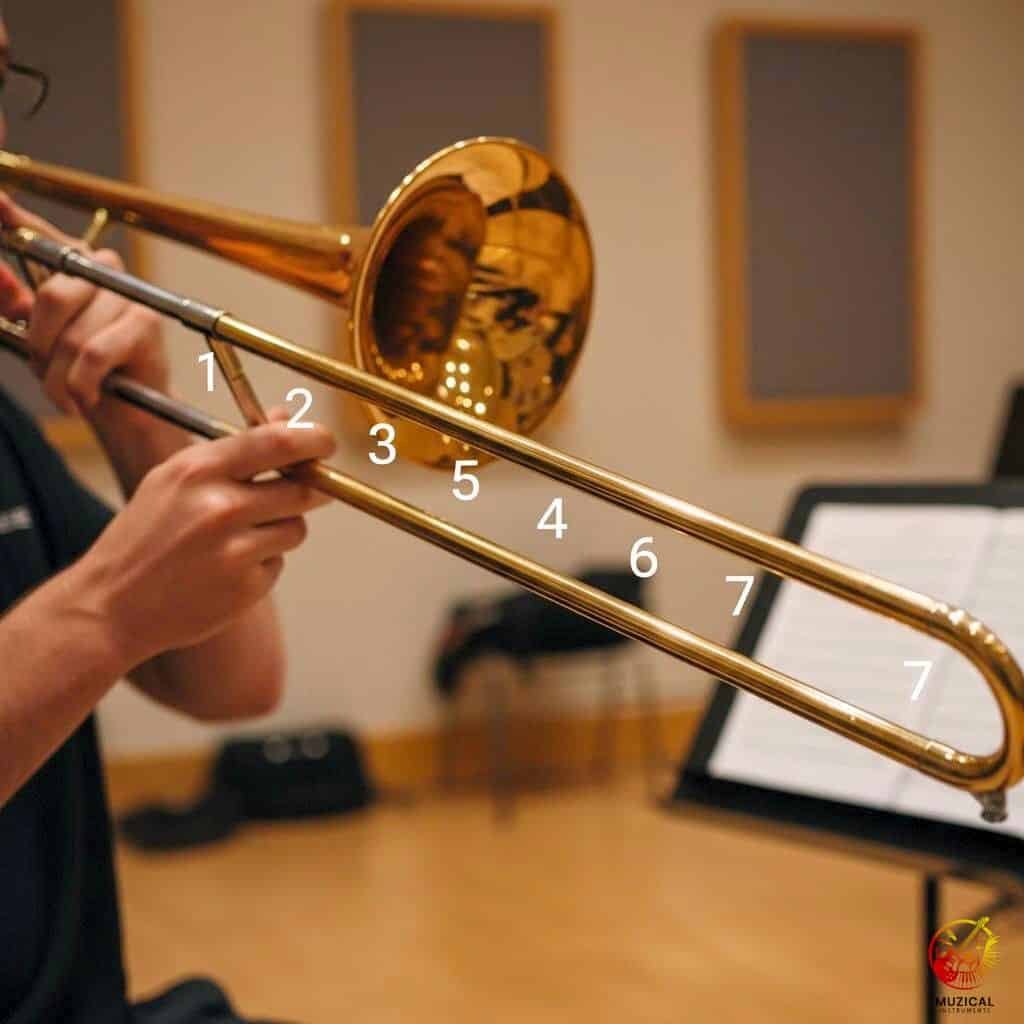
Here are the common seven positions used on a standard Bb tenor trombone. Each position corresponds approximately to where the slide is extended to lengthen the trombone’s tubing, lowering pitch as you extend further.
| Position | Length-approximation | Common Notes (Bass Clef/Tenor Trombone) | Visual / Physical Landmark |
|---|---|---|---|
| 1st | Slide all the way in (short tubing) | Bb (fundamental), F (first overtone), Bb (octave) | Brace near bell; arm relaxed in |
| 2nd | Slightly extended | A, E, A (harmonic series) | Hand just past bell |
| 3rd | Further out | Ab, Eb, Ab | Fingers about ⅓ out; elbow angle visible |
| 4th | Mid-extension | G, D, G | Slide about halfway; wrist angle moderate |
| 5th | More extended | Gb (F#), Db | Arm more stretched; elbow lower |
| 6th | Near full extension | F, C | Slide long; arm stretched |
| 7th | Fully extended | E, B | Slide fully out; maximum reach |
These positions are a foundation. But note: in higher partials or with alternate fingerings, some notes might use alternate slide positions. Also intonation (how in-tune a note sounds) often demands slight adjustments of slide length, even within a position.
Why is it hard to remember slide positions, and what causes confusion?

To grasp how to remember slide positions easily, you need to understand what makes them hard in the first place.
Lack of Fixed Markers
One major reason: there are no fixed markers. Unlike guitar frets or piano keys, your slide moves through open air. Small changes make big differences in pitch. If your ear is not trained, it’s easy to be sharp or flat.
Complications from Partials and Harmonics
Second, partials/harmonics complicate things. The same slide position can produce several notes depending on lip tension, air support, and embouchure strength. For example, 1st position gives you Bb, F, Bb, D, F etc., depending on which overtone you’re using. Because different notes in the same position sound in different partials, your muscle memory must adapt to both space and sound.
Intonation and Environmental Factors
Third, intonation and environmental factors matter. Temperature, humidity, room acoustics, and even ensemble tuning (if the rest of band is sharp or flat) force you to adjust your slide slightly. That means “perfect” position in one situation is only approximate in another.
Because of these issues, many players feel stuck: memorizing slide positions becomes a guessing game unless they combine ear, sight, touch, and regular practice. That’s what makes how to remember slide positions easily more an art than simply memorizing a chart.
Which memory strategies help you solidify slide position recall?

People ask: What techniques help with remembering slide positions? Are there tricks pros use to lock in positions? Let’s cover methods that reliably work.
Visual Anchors & Spatial Mapping
Use parts of your trombone or body as landmarks. For example, note how far the slide is relative to the bell brace, your elbow, or wrist. Visualizing the slide position in relation to those fixed points helps your brain map what each position “looks like.”
Ear Training and Listening for Landmarks
Train to hear specific “landing notes.” When a note rings clear, it’s your guide. You begin to associate certain sounds with slide distances. A pro might hear G in 4th position and immediately know the feel of 4th because of how that partial resonates.
Muscle Memory through Repetition
Repeating slide movement slowly, paying attention to feel, helps your arm learn the distances. Over time, reaching 5th or 7th feels different in length, tension, speed. The more you move between positions deliberately, the easier it gets to remember where they are without looking.
Analogies and Mental Models
Some players imagine the slide positions like the rungs of a ladder: first is the lowest rung, seventh the highest. Others picture a measuring tape or ruler sliding in and out. These mental images help you remember space, interval, and position.
Combining All Senses: Sight, Sound, Touch
When you practice, sing the note, watch your slide move, feel the locations. Some call the position number or note name aloud. That combination of senses cements memory much stronger than just thinking the number silently.
These strategies are central to how to remember slide positions easily. Use them together, not separately, to get the best result.
What exercises improve your ability to remember slide positions?
You may wonder: What drills help me internalize slide positions fast? Here are exercises with concrete examples.
| Exercise | Description | Benefit for memory |
|---|---|---|
| Slow Scales + Drone | Play scales (e.g. Bb scale) slowly while sustaining a drone (Bb or pedal tone). Match pitch carefully. | Helps you connect pitch with slide distance; builds listening ears. |
| Position Callouts | Someone (or you with a recording) calls out “2,” “5,” etc. Then move immediately and play the note. | Forces recall under mild pressure; builds reaction speed. |
| Interval Leaps Between Distant Positions | Jump from 1st to 7th, or 2nd to 5th, and back. | Teaches large spatial jumps so your muscle memory covers extremes. |
| Mirror Practice | Stand in front of a mirror; watch arm extension, elbow angle. Compare your visuals with notes played. | Helps you see and correct inconsistencies; reinforces visual cues. |
| Real Song Fragments | Take a familiar melody (e.g. “Amazing Grace”) and see which slide positions it uses. Practice that fragment calling out positions. | Anchors positions in musical context; makes recall more natural. |
Example: You play a Bb major scale slow, each note held four beats, while a pedal Bb drone plays underneath. You watch, listen, and say “1-first, 2-second…” as you move. That embeds slide positions in multiple ways.
Another example: set your tuner, play a note you think is 3rd position Ab, then compare. If it’s sharp, adjust slightly. Then play without tuner and try to match that feel.
Doing these regularly helps you internalize how positions feel, move, and sound. That is the core of learning how to remember slide positions easily.
How do professional trombonists maintain accuracy and recall under performance pressure?

People sometimes ask: How do pros avoid slide slips in a concert? How do they recall positions in unfamiliar settings?
Adaptive listening. Pros listen constantly, not just for themselves, but for the ensemble’s tuning. If the orchestra is a little flat, they adjust every slide position slightly. The skill is not rigid perfection, but flexible alignment.
Landmark technique. Professionals use “key notes” or “landmarks.” For example, they know where middle G (4th position) feels in their arm for their horn, or how low Bb (1-position) should resonate. Those landmarks act like mileposts on a road.
Alternate positions and sliding subtleties. Sometimes a note can be played in more than one slide position. A pro will choose the position that yields best tone, intonation, or ease of transition. Knowing alternate positions gives flexibility.
Mental rehearsal and visualization. Before a performance, trombonists often rehearse mentally: seeing the slide move in their mind, hearing the note in their head, feeling the arm stretch. Visualization strengthens recall when actual playing under pressure.
These practices show what it really takes to remember slide positions easily in real life, not just in lessons. They combine ear, memory, and adaptability.
Which tools or aids help you solidify memory of slide positions?
There are useful resources, gadgets, and learning aids people ask about. Should I use charts? Tuners? Videos?
Slide position charts
Printed or digital charts (for example, those from Douglas Yeo or Yamaha) show you what notes lie in each position. They are reference tools. Use them less for crutches, more for confirming what your ear and body already feel.
Tuner apps or drones
A tuner helps check whether you are sharp or flat; drones give you a steady pitch to match and train your ear. Use tuners in drills; use drones for ear strengthening.
Video tutorials and recorded demonstrations
Seeing slide positions in motion (angle of elbow, how slide extends) helps especially for visual learners. Watch videos by experienced trombonists.
Recording yourself
Record a video of your practice. Watch your slide reach, arm extension. Listen back. You’ll catch slide sloppiness or inconsistency that you don’t notice in the moment.
Props or physical markers
Some players mark their slide with small, non-damage touch points (e.g. a piece of removable tape) as temporary visual reference while practicing. Over time you remove them as your internal map improves.
All these tools help when paired with the core memory strategies. They support your journey to master how to remember slide positions easily.
Can understanding theory and physics help in remembering slide positions?
Sometimes students ask: Does learning about overtone series, acoustics, or slide physics help me remember slide positions? The answer is yes, especially for deeper, longer-term memory and accuracy.
Overtone / harmonic series
Knowing how partials work (i.e. which overtone you are playing in a given position) helps you anticipate which note will sound. If you know that the 4th overtone in 1st position gives a “D,” you can internally predict whether your slide placement will need slight tweaking. This aids both ear and memory.
Distance between positions isn’t linear
The spacing between, say, 1st to 2nd is much less than between 6th to 7th. Recognizing that helps you adjust your arm movement. It also explains why farther positions feel more stretched and why intonation issues grow.
Instrument design / attachments
Some trombones have valve attachments (F-attachment, D valve, etc.). Bass trombones especially may use these attachments. They change slide positions or provide alternate lengths. Understanding your specific instrument’s design helps you remember your personal map of slide positions.
Environmental physics
Temperature, humidity, metal expansion, even air density affect how far out or in your slide needs to be to hit pitch. Once you’ve played in different conditions you’ll begin to sense when you need to “pull” or “push” the slide slightly. That sense becomes part of how you remember slide positions easily.
Final Thoughts on Making the Positions Second Nature
You’ve seen how to remember slide positions easily isn’t just about memorizing charts, it’s about building the connection between your ear, body, and visual cues.
Know the seven slide positions, use visual anchors and ear training, practice with intention using slow scales and interval jumps, use tools like tuners and charts, and learn theory so you understand what you’re doing, not just copying.
Start today: pick one slide position (for example, 4th), spend five minutes doing slow scales and callouts focusing on that position. Then gradually include more positions. Use visual landmarks on your horn and listen carefully so your brain builds lasting muscle maps.
When you do that, remembering slide positions becomes second nature. Soon, you won’t think how to remember slide positions easily, you’ll just know them. How far you go will depend on practice, patience, and whether you engage all your senses.
Good luck, your slide memory awaits.
FAQ: How to remember slide positions easily on Trombone
1: What are alternate slide positions on trombone?
Alternate slide positions are different slide placements you can use to play the same note more efficiently, smoothly, or in better tune. Because some notes can be reachable in more than one position (especially in higher partials), a player might choose an alternate position for ease of transition or better intonation. Using alternates is part of what helps you master how to remember slide positions easily, you learn more than just one fixed map.
2: How many slide positions does a trombone have?
A standard Bb tenor trombone has seven main slide positions. These positions increase the length of the air column as you extend the slide, lowering the pitch step by step. Some trombones with F-attachments or for bass trombones have additional movable tubing or valves, which allow alternate positions or shifts. Knowing there are seven helps you build a base pattern, which is vital for remembering slide placements.
3: How far should each slide position be from the bell / what does each position look like?
Each slide position has a roughly consistent spatial or visual landmark, first is fully in (close to bell brace), second just out, third further, etc., until seventh (fully extended). Although exact distances depend on your trombone’s size and your arm length, using landmarks like elbow bend, bell-brace alignment, wrist angle or how far your hand reaches help create a visual/spatial map. This visual mapping is important when you try to remember slide positions easily.
4: Can slide positions change based on tuning, partials or room?
Yes. Slide positions aren’t rigid. Depending on partials (which overtone you are playing), your embouchure/lip tension, room temperature, humidity, and ensemble tuning, you may need to slightly adjust slide distance. Even if a position is “textbook,” in certain circumstances you’ll pull or push a bit to get accurate pitch. Recognizing this flexibility is key in learning how to remember slide positions easily under different conditions.
5: What tools or charts help beginners learn slide positions?
There are several helpful aids: printed slide position charts (showing which notes belong in which positions), tuner apps or tuning drones, video tutorials showing slide motion, and recording yourself to compare what you see vs. what you hear. Some resources (like DigitalTrombone and Douglas Yeo’s slide chart PDFs) provide visual charts with harmonic series and alternate positions. These tools help reinforce memory when paired with practice.
6: How long does it take to memorize slide positions?
There’s no fixed time, many things affect how fast you internalize them: how often you practice, whether you practice with intention, ear training, and also using drills like slow scales, interval jumps, and consistent visual landmarks. If you practice regularly (even short daily sessions) and use strategies (muscle memory, visual mapping, ear feedback), you can see solid progress in a few weeks. Full mastery under performance pressure may take months or more, but building reliable recall is quite possible.