Simple MIDI Keyboard Maintenance Tips for Beginners (Make It Last Longer)
MIDI keyboard maintenance helps your controller last longer and work properly every day. Simple care keeps it working well every day. Most beginner problems come from dust, spills, or rough use. Good MIDI keyboard maintenance can stop these issues early.
This guide shows you easy steps you can follow at home.
You will learn
- How to clean MIDI keyboard keys without damage
- How to keep dust and dirt out of MIDI keyboard ports
- How to store your MIDI keyboard the safe way
- How MIDI keyboard maintenance prevents common problems
- How simple care helps your MIDI controller last longer
Why Does My MIDI Keyboard Need Regular Maintenance for Beginners?

Your MIDI keyboard collects dust, oil, and dirt every time you play. These particles build up on the keys, between the cracks, and inside the control knobs. So you need regular maintenance of your MIDI keyboard.
Without regular care, this buildup causes sticky keys, unresponsive pads, and scratchy knobs. Dead keys are one of the most common complaints from MIDI keyboard owners who skip basic maintenance.
MIDI controllers have sensitive electronic components. Unlike acoustic pianos, they can’t handle moisture or rough treatment.
Basic care rules:
- Wash your hands before playing.
- Cover the keyboard when you are not using it.
- Keep drinks away from your setup.
- Wipe it down after every session.
How Do Beginners Clean The MIDI Keyboard Keys?
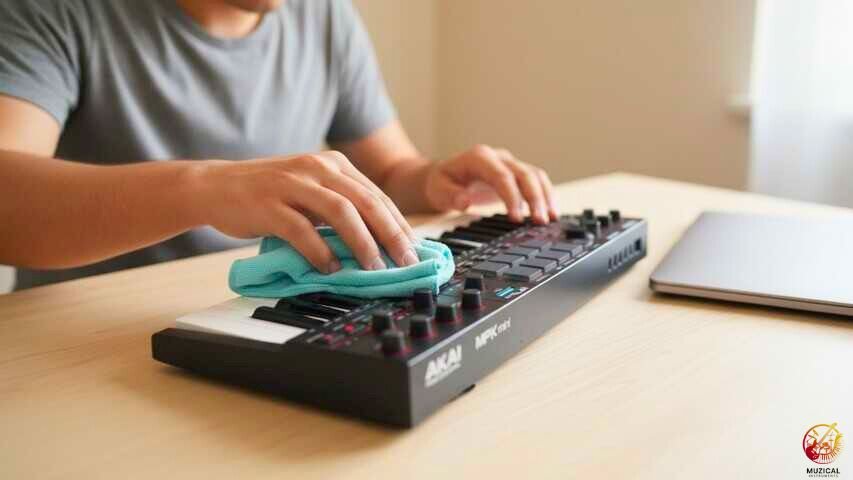
The best way to clean keys is using a slightly damp microfiber cloth. Never spray water or cleaner directly onto the MIDI keyboard keys, as liquid can drip inside.
Start by turning off the keyboard and unplugging it. This prevents any accidental signals or electrical shorts while you clean.
Take your microfiber cloth and wet a small corner with water. Wring it out until it is almost dry. You only want it damp enough to pick up finger oils.
Gently wipe each key from top to bottom. Don’t press too hard. You just want to remove the surface grime.
For stubborn spots, you can use a tiny drop of mild dish soap on the cloth. Avoid harsh chemicals like bleach or alcohol. These can dry out the plastic or ruin the finish.
Steps for cleaning keys:
- Unplug the USB cable.
- Use a dry cloth to remove loose dust.
- Use a damp cloth for fingerprints.
- Dry immediately with a fresh cloth.
How Often Should Beginners Do MIDI Keyboard Maintenance?
Beginners should do a quick wipe-down every time you finish playing. A deeper MIDI keyboard maintenance session, like cleaning between keys, should happen once a month.
Daily care is quick. It takes less than a minute. Just wipe the surface dust away so it doesn’t settle overnight.
Monthly care takes a bit more time. This is when you check the knobs, faders, and pads. You look for grime building up in the cracks.
If you play every day, you might need to deep clean more often. If you only play on weekends, once a month is perfect.
Most beginners should stick to this simple routine and not overthink it. This is enough for beginners to keep their MIDI keyboard clean, safe, and working well for a long time.
Maintenance Schedule:
This table shows a simple MIDI keyboard maintenance routine for beginners.
| Task | Frequency | Why do it? |
|---|---|---|
| Dust Wipe | Daily | Prevents buildup inside sensors. |
| Hand Washing | Before Use | Keeps oils off the plastic. |
| Deep Clean | Monthly | Removes stuck grime and dirt. |
| Check Cables | Monthly | Ensures good connection. |
What Is The Best Way To Remove Dust From Between The Keys?
A soft paintbrush or a can of compressed air is best for getting dust out of tight spaces because cloths cannot reach everywhere.
If you use a paintbrush, get one with soft bristles. Brush the dust away from the keys, pushing it off the side of the keyboard.
If you use compressed air, be careful. Hold the can upright. Use short bursts of air. Do not spray too close, or you might freeze the plastic.
For beginners, this prevents early damage
Warning: Do not blow on the keys with your mouth. Your breath has moisture. This moisture can rust the metal contacts inside the keyboard.
How Can I Protect My MIDI Keyboard From Dust?
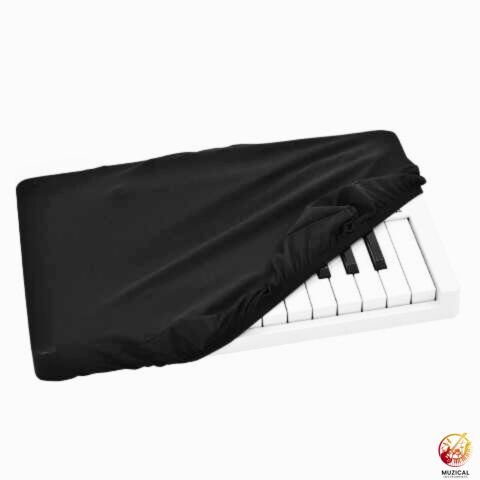
The easiest way to protect MIDI keyboard setups is to use a dust cover. This simple item is the best defense against long-term damage.
You can buy stretchy covers made for keyboards. They fit snug and keep everything out.
If you want to save money, a clean towel or a scarf works too. Just lay it over the keys when you are done playing.
Make sure the cover completely hides the keys, buttons, and knobs. Dust floats in the air all the time. A cover stops it from landing on your sensors.
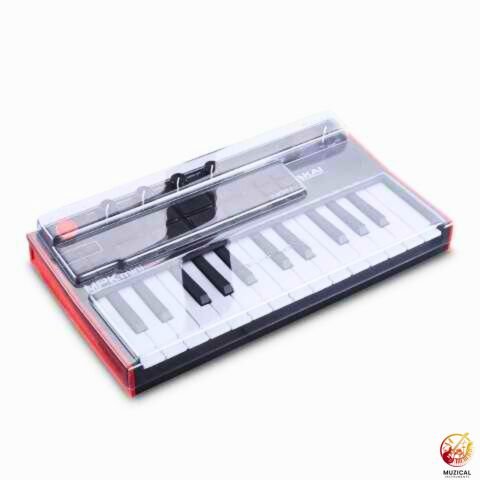
Cover options:
- Spandex dust cover: Fits tight and looks professional.
- Plastic decksaver: Hard shell that protects against heavy hits.
- Cotton towel: Cheap and easy, but lets some fine dust through.
Can Humidity Damage A MIDI Controller?
Yes, high humidity can ruin the electronics inside your controller. Moisture in the air causes corrosion on the circuit boards.
If you live in a damp place, be extra careful. Try to keep your music gear in a room with stable temperature.
Dehumidifiers can help if your room is very damp. You can also use small silica gel packets. These are the little bags that come in shoe boxes.
Place a few silica packets near your keyboard if you store it in a case or a drawer. They soak up extra moisture from the air.
How Do I Clean The Rubber Drum Pads?
Use a piece of masking tape or painter’s tape to lift dust off the rubber. This is safer than scrubbing. Because rubber pads need a different touch than plastic keys. They attract dust and skin oils very easily.
Press the sticky side of the tape onto the pad. Peel it off. The dust comes up with the tape.
For oils or stains on the pads, use a damp cloth with a tiny bit of soapy water. Rubber can degrade if you use strong cleaners, so stick to water and mild soap.
Why Are My Knobs And Faders Acting Jittery?
Jittery knobs usually mean dust has gotten inside the potentiometer (the part that turns).
When you turn a knob and the value on your screen jumps around, the sensor is dirty. This is called “potentiometer noise.”
To fix this, you can try “working the knob.” Turn it back and forth quickly for about 30 seconds. This friction can sometimes knock the dust loose.
If that doesn’t work, you might need a specialized cleaner called contact cleaner. However, this is for advanced users. For beginners, try the rapid turning method first.
This simple step often fixes the problem and keeps your controller easy to use for beginners.
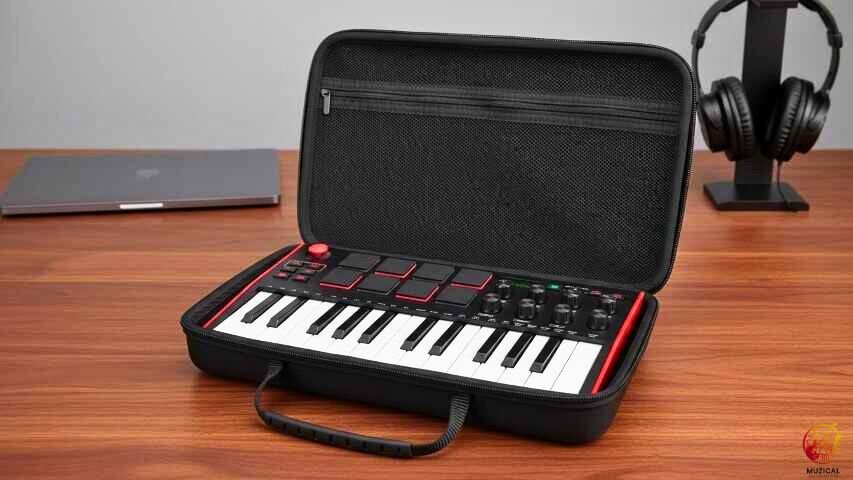
How Should I Store My MIDI Keyboard Safely?
Store MIDI keyboard gear flat and off the floor to prevent accidents. Never lean a keyboard against a wall, as it can warp or fall over.
If you have a desk, leave it there with a cover on. If you need to put it away, use a gig bag or the original box.
The original box is great for storage. It has foam padding that fits your keyboard perfectly.
Avoid storing it in direct sunlight. The sun can turn white keys yellow. It can also make the plastic brittle and weak.
Storage Checklist:
- Lay it flat (horizontal).
- Keep it covered.
- Unplug all cables.
- Keep away from radiators or windows.
Most beginners should follow this simple storage setup and not add extra steps. This is enough for beginners to keep their MIDI keyboard safe from damage and daily wear.
How Do I Care For The Usb And Pedal Ports?
The metal ports on the back are often ignored, but they are vital. Prevent damage to MIDI keyboard ports by unplugging cables gently.
Never yank a cord by the wire. Always hold the hard plastic plug. Pulling the wire can break the internal connections.
Check the ports for lint or dust. If you see fuzz inside the USB port, use a dry toothpick to gently fish it out. Do not use metal objects like needles.
If you move your keyboard often, consider leaving a short USB extension cable plugged in. This way, you plug and unplug the extension, not the main port on the keyboard. This saves wear and tear on the expensive unit.
These small habits help you avoid port damage and keep your MIDI keyboard working without stress.
Does Firmware Matter For Maintenance?
Yes, keeping your software up to date is part of MIDI keyboard longevity tips. Manufacturers fix bugs and improve performance with updates.
Go to the website of the brand that made your keyboard. Look for the “Support” or “Downloads” section.
Check if there is a new driver or firmware for your model. Sometimes, a keyboard acts broken just because the software is old.
Updating is usually easy. You download a file and run it while the keyboard is plugged in. Follow the instructions on the screen carefully.
Common Software Issues vs. Hardware Issues:
This table helps beginners spot software problems before assuming hardware damage.
| Symptom | Likely Cause | Solution |
|---|---|---|
| Keys don’t make sound | Software / Connection | Check USB cable and DAW settings. |
| Sticky physical key | Dirty Hardware | Clean around the key. |
| Random values jumping | Dirty Sensor | Rotate knobs quickly or use air. |
| Device not recognized | Outdated Driver | Update firmware/drivers. |
How Do I Maintain The Pitch And Mod Wheels?
The pitch bend and modulation wheels are open slots where dust loves to hide.
Use your vacuum cleaner with a hose attachment. Hold the hose near the wheels while you move them up and down.
Do not touch the vacuum nozzle to the wheel itself. Just get close enough to suck up the floating dust.
Moving the wheels while vacuuming helps dislodge hidden dirt. This keeps the movement smooth and prevents the sensors from getting clogged.
Final Thoughts
Regular MIDI keyboard care takes just minutes each week but saves hundreds in repair costs.
MIDI keyboard maintenance for beginners is all about simple habits you can follow every day.
Cover your keyboard when you are not playing. Wash your hands before touching the keys. Clean it gently with a slightly damp cloth.
These easy steps stop most beginner problems before they start. Your keyboard will feel better to play and last for many years when care becomes part of your music routine.
This simple guide covers everything beginners need for safe and effective MIDI keyboard maintenance.
FAQ: MIDI Keyboard Maintenance Tips for Beginners
1. How do I fix a sticky key on my MIDI keyboard?
Sticky keys usually happen because dirt or spilled drinks get underneath them. To fix this, first unplug your keyboard. Use a thin piece of stiff paper or a business card and gently slide it between the keys to dislodge crumbs. If that doesn’t work, you can use a can of compressed air to blow out the debris. For very sticky keys, you might need to take it to a repair shop.
2. Is it safe to use alcohol wipes on my keyboard keys?
It is better to avoid alcohol wipes if you can. Alcohol can sometimes dry out the plastic or fade the labels on buttons. The safest cleaner is a microfiber cloth with a tiny bit of water and mild dish soap. If you must use alcohol to kill germs, make sure it is a very small amount and dry it off immediately.
3. Why are my keyboard keys turning yellow?
Keys turn yellow mostly because of sunlight. The plastic reacts to UV rays from the sun over time. This changes the color but usually doesn’t hurt how the keyboard plays. To stop this from happening, keep your keyboard away from windows or cover it with a cloth when you aren’t using it.
4. How long do MIDI keyboards usually last?
If you take care of it, a good MIDI keyboard can last for 5 to 10 years or even longer. The parts that break first are usually the USB ports or the keys if you hit them very hard. Keeping dust away and unplugging cables gently will help it last a long time.
5. Can I use a vacuum cleaner on my music gear?
Yes, but you have to be careful. Do not use a strong vacuum directly on the keys, as it might suck up loose buttons or damage parts. Instead, use a vacuum hose with a soft brush attachment. Hold it a few inches away from the keyboard to suck up floating dust without touching the delicate parts.


