Why You Must Clean Accordion Keys Safely
Cleaning your accordion keys is not just about making it look nice. If you clean accordion keys without damage, you help:
- Prevent sticky keys (they get gummed up).
- Avoid discoloration or yellowing.
- Keep dust, sweat, oils off, which can wear parts faster.
- Prolong the life of your instrument.
But keys are delicate. Too much liquid, harsh chemicals, or careless handling can ruin the keys or let water get inside. So you need a safe accordion key cleaning method with a careful, gentle approach.
In this article, you’ll learn how to clean accordion keys step by step, what to avoid, and useful tips and mistakes beginners often make.
What Are Accordion Keys, and What Makes Them Delicate?
Accordion keys are the white (or black) piano style keys you press to play melody. Underneath them, there are rods, hinges, springs, and valves. Dirt or grime that seeps into gaps can interfere with movement, making keys stick.
These keys are often made of plastic, celluloid, or materials that react badly to alcohol or harsh solvents. Many accordion players warn: “Don’t use alcohol or anything with acetone.”
So your cleaning method must:
- Use mild, safe cleaners.
- Use minimal liquid.
- Prevent liquid from seeping into the interior.
- Be gentle with the parts.
Why it’s Important to Clean Accordion Keys
Keeping your accordion keys clean is not just about looks. It’s a key part of your accordion maintenance guide. Here’s why it matters:
- Better Playability: Grime and dust can make keys stick. This makes it hard to play notes smoothly. Clean keys move freely, so you can play your music without any trouble.
- Longer Lifespan: Dirt and dust can get inside the accordion. This can damage the delicate parts inside, like the reeds and pallets. Regular cleaning protects your instrument from long-term damage.
- Prevents Damage: The oils from your fingers can build up on the keys. Over time, this can damage the celluloid or plastic that the keys are made of. Cleaning them regularly prevents this from happening.
- Looks Better: A clean accordion is a happy accordion. Keeping the keys white and shiny makes your instrument look well cared for.
Think of it like brushing your teeth. You do it every day to prevent problems later. Cleaning your accordion keys is the same idea. It’s a simple habit that makes a big difference.
Before You Begin: What You Need, and Precautions
Tools & Materials
Here’s a simple list:
| Item | Purpose |
|---|---|
| Soft microfiber cloths | To wipe keys gently |
| Lint-free cotton swabs or cotton balls | Reach between keys |
| Mild dish soap or gentle liquid soap | Diluted for cleaning |
| Warm water | To mix soap solution |
| Small soft brush (e.g. artist’s brush or unused toothbrush) | Clean crevices and edges |
| Dry soft cloth | To dry afterward |
| A shallow dish or bowl | To mix water + soap |
| Optional: “key cleaner” or polish designed for instruments | Use only safe brands |
| Optional: Jeweller’s polishing cloth | For metal parts or decorative elements |
Also, prepare a dry, clean workspace. Lay down an old towel or soft mat to prevent scratches.
Precautions to Remember
- Always wring out cloths. They should be damp, not dripping.
- Never spray cleaner directly onto the keys or the accordion body. Spray on cloth only.
- Avoid alcohol, acetone, or strong solvents. They may discolor or damage key surfaces.
- Keep water away from wood parts, valves, and the insides.
- If your accordion has been unused and is dusty, open the case and maybe use a soft dry brush first to remove loose dust.
- Don’t overdo it. Frequent light cleaning is better than a big harsh cleaning.
- If interior parts (reeds, bellows) need cleaning, that’s often best left to a professional.
Step by Step: How to Clean Accordion Keys Safely
Here’s a clear, stepwise guide.
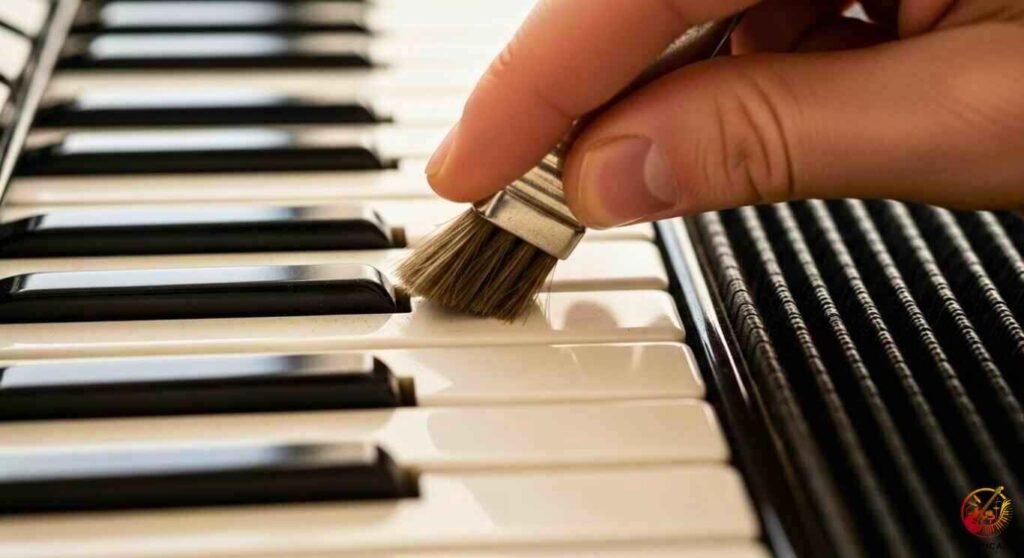
Step 1: Remove Loose Dust and Dirt
- Use a dry microfiber cloth or soft brush to gently wipe across the keys, in the direction from back to front (or side to side), removing dust or debris.
- For gaps between keys, lightly use a soft brush or compressed air (short bursts) at a safe distance. Don’t blow liquid or directly into interior parts.
- Make sure the accordion is stable (in your lap or on a table) so you don’t accidentally bump it.
Step 2: Prepare a Mild Cleaning Solution
- Fill a shallow bowl with warm water (not hot).
- Add just one or two drops of mild liquid soap. Mix gently until you see mild suds.
- The solution should be very gentle and mild.
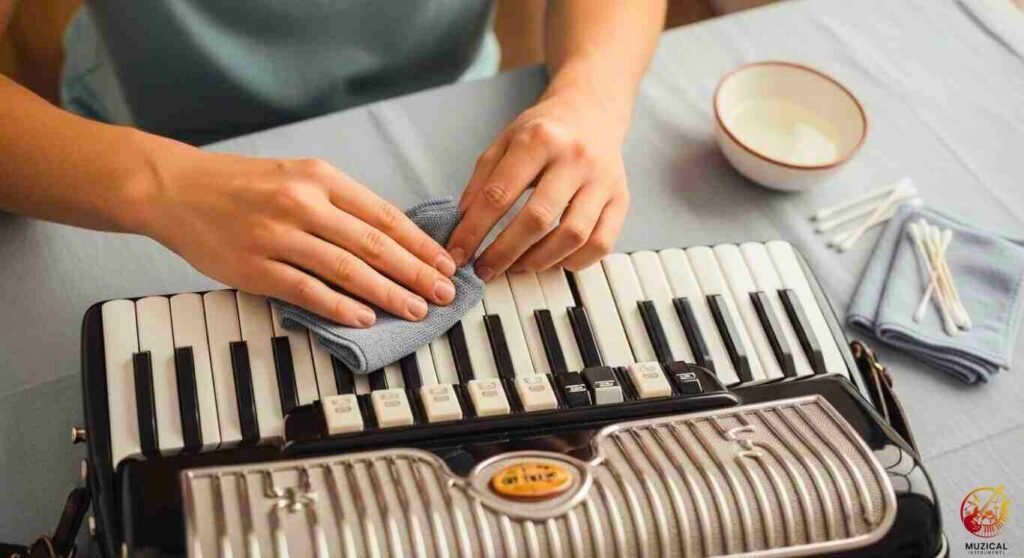
Step 3: Dampen the Cloth, Wipe the Keys
- Dip a corner of microfiber cloth into the soap solution.
- Wring it out well so it’s damp, not dripping.
- Lay the cloth over the keys and wipe gently. Use long, consistent strokes.
- Work in small sections maybe 3–4 keys at a time rather than the whole keyboard at once.
- For tougher spots or sticky grime, use a cotton swab dipped in solution (again, wring it) and work gently between keys.
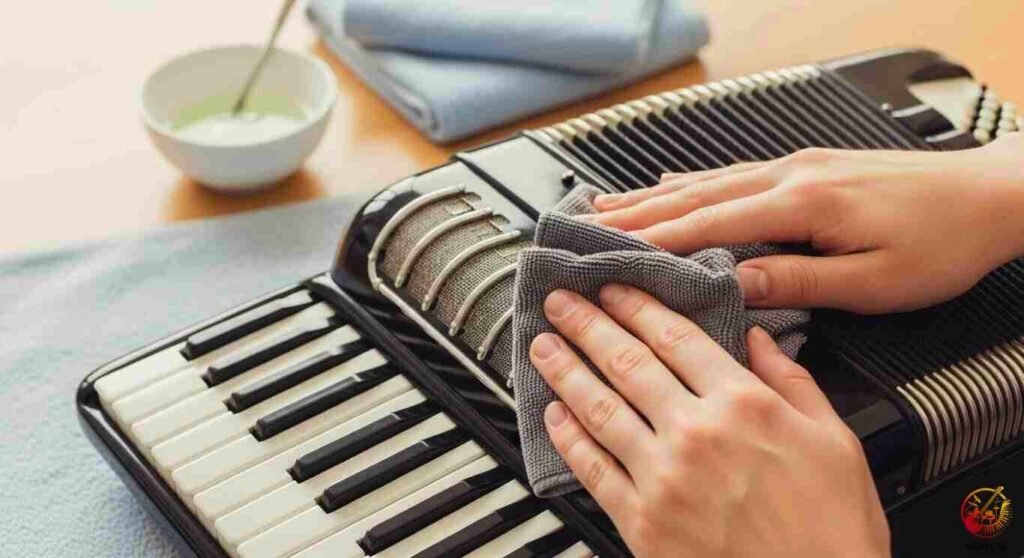
Step 4: Clean Edges and Tight Spaces
- Use the soft brush (or a barely damp cotton swab) to enter the crevices between keys and at their joints.
- Be extra gentle near the back of the keys, near hinges or rods.
- If the keys have decorative metal edges or grills nearby, you can use a jeweller’s polishing cloth lightly but only on the surface, not pushing into gaps.
Step 5: Dry Immediately
- After wiping a section, use a dry soft cloth to pat dry or gently wipe moisture away.
- Go key by key, ensuring no drops remain.
- Let the accordion sit open for a few minutes so residual moisture evaporates.
Step 6 (Optional): Use a Safe Polish or Key Cleaner
- If you have a commercially made key cleaner or polish made for musical instruments (for instance, the “Key-Brite Key Cleaner” in some accordion care kits), test it first on a small hidden area.
- Apply it to a cloth (not directly on the keys) and buff lightly to restore shine.
- Don’t overuse polish too much might lead to residue buildup.
Step 7: Final Check & Reassembly
- Inspect each key again for moisture or leftover debris.
- Close the cover (if any) and store in its case or dust cover.
- Play a few keys to ensure smooth action.
Common Mistakes Beginners Often Make
- Using too much water or a dripping cloth liquid can seep into internal mechanisms.
- Spraying cleaner directly onto the keys (instead of onto cloth).
- Using alcohol, acetone, or harsh solvents these damage key surfaces.
- Skipping drying moisture left behind can cause warping, mold, or rust in metal parts.
- Pressing too hard force can bend small parts or misalign rods.
- Neglecting edge areas or hinges, which trap grime over time.
- Trying to clean or adjust internal parts (reed blocks, valves) without training they are fragile.
Advanced Tip (For Curious Users)
If you ever need to remove keys for deep cleaning or repairing, a more advanced method exists. One guide describes:
- Lifting keys from their metal rod (spindle) carefully.
- Cleaning brass flanges with a toothbrush and mild oil.
- Replacing keys by aligning spring and hinge.
- Testing each key’s movement before final assembly.
However, this is risky if you’re a beginner. Mistakes may misplace springs or damage parts. Only attempt this after you’re confident or with expert guidance.
Compare Cleaning Options vs Risk
| Method | Ease (for beginner) | Risk | Best Use |
|---|---|---|---|
| Dry microfiber cloth | Very easy | Minimal | Routine cleaning |
| Mild soap & damp cloth | Easy to moderate | Low (if careful) | Periodic cleaning |
| Commercial key cleaner / polish | Moderate | Low to medium (depends on product) | Restoring shine |
| Removing keys & deep cleaning | Hard | High | Only if needed and you know what you do |
| Strong solvents / alcohol | Easy | Very high | Do not use |
Summary & Final Takeaway
You’ve learned the safe way to clean accordion keys:
- Remove surface dust with a dry cloth or brush
- Use a very mild soap + water solution, damp cloth (never dripping)
- Wipe gently, section by section
- Use soft brushes or cotton swabs in crevices
- Dry immediately and thoroughly
- (Optionally) Use a safe polish or key cleaner
- Avoid harsh chemicals, avoid interior parts unless you know what to do
If you treat your instrument gently and clean regularly, your keys will stay smooth, bright, and functional longer.
FAQ: Clean Accordion Keys
1. How often should you clean accordion keys?
A light wipe (dry cloth) after every few uses is good. A deeper cleaning with mild soap every few months (or as needed) works well.
2. Can I use alcohol-based cleaners on piano accordion keys?
No. Many accordionists warn against alcohol or acetone because they can damage the key surface or discolor it.
3. What if keys are yellowed?
For slight discoloration, a gentle cleaning can help. But deep yellowing (age, oxidation) may require special treatment by a restoration expert. Be cautious strong chemicals can do more harm than good.
4. Will moisture damage the interior of accordion?
Yes. Moisture getting inside can harm wood, reeds, and valves. That’s why you must use minimal liquid and dry thoroughly.
5. Can beginners clean internal parts like reeds or bellows?
Usually no. Internal parts are delicate and require professional skills. Beginners risk misalignment or damage.


